

Wednesday, August 31, 2011
A Splash of Yellow
I'm finally getting myself organized to enter a couple of blog challenges. I have done a couple on FCCB but now I have a list of others that I think will be fun. Here is my card for both the Fantabulous Cricut Challenge (Use yellow) and the Birthday Sundaes challenge (be inspired by the photo).
 The photo at Birthday Sundaes was of cupcakes on a plate. I used the cupcake from Straight from the Nest, cutting the bottom layer in a tan, the next layer in the required yellow, and the frosting in white. I wanted to use the confetti paper for the background but had only a scrap left so I punched a yellow border to add to the bottom. I put a navy blue behind the printed paper and used it for the "stick". I used Divine Swirls cuttlebug embossing folder on the frosting and colored the little holes on the yellow layer with varied markers to represent sprinkles. I hand cut the flag and stamped it with my only set of stamps - a birthday set from Papertrey Ink. Of course I had to pop the cupcake up with dimensionals.
Tuesday, August 30, 2011
I'm So Excited!!!
I have been using a baby bug since I first got into the Cricut world last August. With that, I used Design Studio to plan out my cut sizes and lay out my cards on the 6 x 12 mat. A month ago, I decided to buy myself a birthday present and went on eBay to get a Cricut Expression. I won the bid on this beauty.
 I was excited about the red, since it's my favorite color and also the color of the walls in my craft room.
I have been so busy since purchasing it, that I just now, one month later, actually turned it on and began using it. WOW!!!!! It is SO much better than the personal Cricut I can't believe it. The actual picture of the cut you are making comes up on the screen. Who knew? That is such a help. I know I'm probably preaching to the choir since many of the bloggers already have used the Expression for years and have now gone on to the Expression 2, but I just can't contain my excitement. And the center point cut is wonderful! Since I do all of my sentiments on the computer, this will be one of the handiest features on my new machine. Okay, enough jumping up and down. I need to get back to my machine and begin making some cards. See you all tomorrow with a card I made for a couple of challenges BE (Before Expression).

I have been so busy since purchasing it, that I just now, one month later, actually turned it on and began using it. WOW!!!!! It is SO much better than the personal Cricut I can't believe it. The actual picture of the cut you are making comes up on the screen. Who knew? That is such a help. I know I'm probably preaching to the choir since many of the bloggers already have used the Expression for years and have now gone on to the Expression 2, but I just can't contain my excitement. And the center point cut is wonderful! Since I do all of my sentiments on the computer, this will be one of the handiest features on my new machine. Okay, enough jumping up and down. I need to get back to my machine and begin making some cards. See you all tomorrow with a card I made for a couple of challenges BE (Before Expression).
Monday, August 29, 2011
Back on Your Feet
Sometimes the wording in a purchased get well card doesn't say the thing you want to address. That's why making your own is such a good idea. When a friend had minor back surgery, I sent this card.
 The boot is cut from the Just Because Cards cartridge. Using Design Studio, I welded the shadow layer to make the shaped card in dark brown. I cut the top layer in a lighter brown and embossed it with the Tiny Mosaic cuttlebug folder. The stirrup is silver cut from DCWV's metallic 4.5" by 6.5" stack and the design is from the same dark brown as the shadow. I cut another top layer in white to mount on the inside with my sentiment printed on it. It reads "Hope you're back on your feet soon!"

Sunday, August 28, 2011
Birthday Card
I'm hoping and praying that everyone survived Hurricane Irene without too much damage. I have two brothers and their families that live in New Bern, North Carolina, one of the hardest hit areas. We haven't heard from them but have heard than many in the area are without power so hopefully they will contact me when they can.
This is a birthday card I sent to a special friend. I had just used A Child's Year to make an anniversary card and thought this girl was cute. I cut her out of purple and used the same color under the lacy border punch.

This is a birthday card I sent to a special friend. I had just used A Child's Year to make an anniversary card and thought this girl was cute. I cut her out of purple and used the same color under the lacy border punch.

The white was embossed with my cuttlebug using Birds and Swirls and the checked piece was from my scrap drawer. There is no sentiment on the front so it could be used for any occasion.
I just finished 7 pillow covers for my granddaughter so now I'm free to create cards and layouts. I wonder what challenges lie in store for me this week?
Saturday, August 27, 2011
Another Birthday
Today is my youngest son's birthday, although he's not so young anymore. A lot of bloggers say how difficult it is for them to do masculine cards. I don't find it difficult at all, which is good since I have three sons. I guess I'm just not a "blingy" girl and try to keep things simple so it suits cards for men. This is the one I did for my son.

It's not very fancy. I glued an old dictionary page to a tag and then inked the edges. The Happy Birthday was cut from MS Elegant Cake. Even though the dot said it should be cut at 5" tall, I cut it at 2" and it was the perfect size. I cut it from the same rust paper that I used under the stripe from DCWV's Amber Autumn. I added three different ribbons/strings and pop dotted the tag.
I plan to do some more challenges and I want to give a shout out to Cheryl at http://cardsbycg.blogspot.com. She sent me her list of challenges by day and told me how to list them on my page for reference. She also does wonderfully creative work. Please check out her blog.

I plan to do some more challenges and I want to give a shout out to Cheryl at http://cardsbycg.blogspot.com. She sent me her list of challenges by day and told me how to list them on my page for reference. She also does wonderfully creative work. Please check out her blog.
Friday, August 26, 2011
Two weeks have passed
It's been two weeks since my last post. A lot has been going on and I haven't had the time to get into my craft room. I had originally posted some of the details but then - being new to blogging - I accidentally left the dashboard and when I came back I could not edit my draft. Or my post. Live and learn I guess. Anyway, here's my first card in a while, ready for two challenges.


This card is based on a sketch for the challenge at http://mojomonday.blogspot.com/ I have never done designs from sketches before and thought it would stretch my creativity.
The stripe paper is from a craft store near the lake and is from Kaisercraft. The polka dot is SUI's Bitty Dots and the purple from Core'dinations assorted strips. I used a punch on the pink and wanted to use my Cricut for a border on the purple. My Design Studio isn't working and since I was pressed for time, I just tore the edges. The sentiment was printed on the computer and cut from Storybook along with the purple shadow. I made a test cut and then lined up the print so it would cut in the right place. I also plan to enter it into the FCCB birthday challenge.
I have some sewing to do but I will get another card or two done so I'll have posts for the rest of the weekend.
Sunday, August 14, 2011
Using up paper
A lot has been going on this past week. I did get to post some cards I'd made previously and will have to do the same today. I have Girls' Week, even though it will be only 2 days this year, with my mother, daughter, daughter-in-law and 4 of my granddaughters on Monday and Tuesday. After they leave on Wednesday, I have to get ready for my class reunion on Saturday. That means no new cards until next week unless I can sneak one in. I did have to miss the FCCB challenge this week and I had a real good idea for a bug card. Oh well.
This card uses up the printed portion of a paper from the Amber Autumn stack by DCWV. I had used the unprinted part of the paper for another card because it was the color I needed. Not one to waste paper, I came up with this.

This card uses up the printed portion of a paper from the Amber Autumn stack by DCWV. I had used the unprinted part of the paper for another card because it was the color I needed. Not one to waste paper, I came up with this.

The printed paper is matted with 2 colors from the leaves. Then I cut out the leaves from one of those colors using Accent Essentials and popped the top one up with dimensionals. I printed the sentiment on my computer and punched it out with a 1 1/2" punch. I rubbed some distress inks over it to give it some leaf color.
I have a new tool in my craft room but I haven't even had time to check it out. I'll let you in on it at the end of the week. Can you guess?
Thursday, August 11, 2011
My son's birthday card
This is the card I made for my son. I knew there was a reason I wanted the Sportmania cartridge. The card base is a modified z fold. The golfer is cut in 4 layers: the shadow in cream, background in light brown, next layer in navy and the pants layer in green.
 The golf ball holds the card closed. I punched it at 1 1/2" and then ran it through my cuttlebug with Swiss Dots. Then I ran it through a second time, offsetting the dots. You can see the detail below.


Looks almost like the real thing. The sentiment was printed on cream paper and hidden behind the fold.
Wednesday, August 10, 2011
Z fold Birthday
My twins celebrated their birthday yesterday, so now I can post their birthday cards. This one was for my daughter.

 Here is a look at the inside. I printed the sentiment on the computer and mounted it on some of the Bitty Dot paper. She loved it!

Some people do long explanations about their cards. I guess I'm not going to on this one since I didn't write it down when I made it (shame on me) and I can't find the end I cut off that tells me what paper I used. I thought it was cute paper and had some of the aqua that matched, and used a polka dot from PTI Bitty Dots. I'm not even sure where I got the Cricut cuts from but there are lots of these shapes on various cartridges. I used a punch across the top.

Saturday, August 6, 2011
Paint the town red
I got the Handyman cartridge in June because I have a lot of mission work projects to scrap. I decided that it would also make nice masculine birthday cards. This is the one I made for my adult grandson.

The card is 5 x 7 from a purchased set of plain white cards and envelopes. I printed the sentiment on the bottom and left it as a white border. There was a paper in the DCWV Picture Stack that was part of a dark sky which became the background. The skyline is from Plantin cut in red and black. Both are cut the same size and then offset when glued down. The paint brush is from Handyman using kraft paper for the layer that shows as the handle and bristles. The inside sentiment "Paint the town red" is written in Wet Paint font in red which really put the final touch on the card. I should have taken a picture of it but alas, it's gone now.
Friday, August 5, 2011
Get Well
Today's card is another one I did some time ago. I think today's and yesterday's cards are trials from new carts I bought at or near the same time. At least I remember where this one came from. Cindy Lou.


This card is 5 x 7. The background paper was something I had, probably from JoAnn's since that's the only place somewhat near where I can get paper. The navy and purple just seemed to blend well with it. The ovals are cut with my only set of Nestabilities. I mainly wanted them so I could center a computer printed sentiment on them. They looked a little unfinished so I added the strips of matching paper and then the bling of navy pearls. Since there are few layers, it was a quick and easy card, simple yet elegant. Love that kind!
Thursday, August 4, 2011
Sympathy Card
My DIL's grandma passed away and I thought I'd send her this sympathy card I made a while ago.


For the life of me, I can't remember what cartridge I used. This was BB (before blog) and I didn't write it down. I'll research it and add the the post later. I can't even tell you what paper I used except for the background which is from the Specialty stack by Cloud 9 Design.
I went through my cart manuals (fortunately I only have 24) and I still couldn't find where this design came from. Well, no, I didn't look through some I "knew" they wouldn't be in like Sportsmania, but somehow I overlooked it. Maybe someday I'll come across it again.
Wednesday, August 3, 2011
Friend Card
I'm finally back at it again. Personal matters have kept me from cardmaking and posting but things have settled down some and I can get back to doing the things I love. I will be busy next week cleaning out and repairing my parents house with 3 of my brothers and my sister, so I won't be able to do any crafting which means I need to get my card making done ahead. Since 3 of my children have August birthdays, I had to do that anyway, plus I want to continue to enter FCCB challenges and today's card is one for there.
The challenge this week is to make a friend card. I love the saying "If friends were flowers, I'd pick you" and based my card on that.
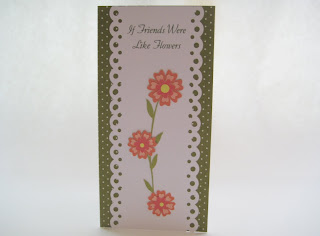
The challenge this week is to make a friend card. I love the saying "If friends were flowers, I'd pick you" and based my card on that.

This is what I call a Monarch card since the size is 7" by 3 1/2". I have my computer set to print sentiments on different size papers, and so I printed the inside sentiment on a 7 x 7 piece of white cardstock. The green polka dot from PTI's Bitty Dot stack is cut 7" x 3 1/2". The white middle portion was printed on the computer and then border punched. The flowers are from Kate's ABC - all layers cut except for the center dot which is cut with a hole punch The large flower is is cut at 3" and the other two at 2 1/2". The paper is from a strip stack of Coredinations ColorCore, except the green which was a scrap. I did not make the green layer for the bottom flower since I did not need the extra stem. I like simple and this is typical of the cards I like to do.
Subscribe to:
Posts (Atom)