Tuesday, July 26, 2011

Have a Blast!

This is a birthday card for a 4 year old boy.  I promised him I would send him a special card and I hope this fills the bill.  I think it is rather fun, especially since I put his name on the inside.

This is an easel card.  I cut white cardstock 4 1/4 by 11, and scored at 5 1/2 and 2 3/4.  I then cut a piece of white and the cloud paper from Reminisce at 5 1/2 by 4 1/4 and glued them together to make it stronger.  The rocket is from the Just Because Cards cartridge cut at 4".  I used scraps, picking a blue for the shadow that is close to the color of the sky.  I used this same blue, cut 4 1/4 by 2 for the background piece for the sentiment and used the Spots and Dots cuttlebug folder on it.  The parts of the rocket have been inked around the edges.  The photo doesn't show but I used a holographic paper for the portholes and it looks real good in person.  The "Have a Blast!" was printed with my computer program in Firestarter font with a varigated color.

I'm beginning to understand that I can't take vertical pictures of cards and have them come out in the right direction on the blog even if I turn them in my picture file.  Now to just get the lighting right and I may be able to publish some good pictures. :)

Monday, July 25, 2011

I'm Baaack!

I just got back from a week at one of the most beautiful lakes in the world, according to us Michiganders who have cottages there.  At one time National Geographic had ranked it as number 6 but Wikipedia says they deny that.  Ranked or not, it IS one of the most beautiful.  I'm sure glad I was there during such a hot week.  It takes a while for the lake to warm up but it was just perfect for playing in the water with two of my granddaughters.
Now it's time to get back to cardmaking.  I have four birthdays coming up that I need to make cards for.  Of course, I won't be able to post them until after they've been received just in case one of them should happen upon my blog - which is doubtful.  I do have one I can post today that I made before I left.


This is a belated birthday card made with the Paisley cartridge.  The elephant was cut from 2 shades of gray from  a DCWV neutral stack with the background layer in black.  I inked around the edges with Distress Ink in soot black.  The yellow plaid paper was something I had from a long time ago.  The bottom corners are rounded.  The sentiment was printed on my computer using the Comic Sans font.  Inside it says"  But sometimes I do.  Hope your birthday was happy."


Friday, July 15, 2011

The last two

Here's another picture of the pile I started with.

Here they are, the last two cards finished from my pile.


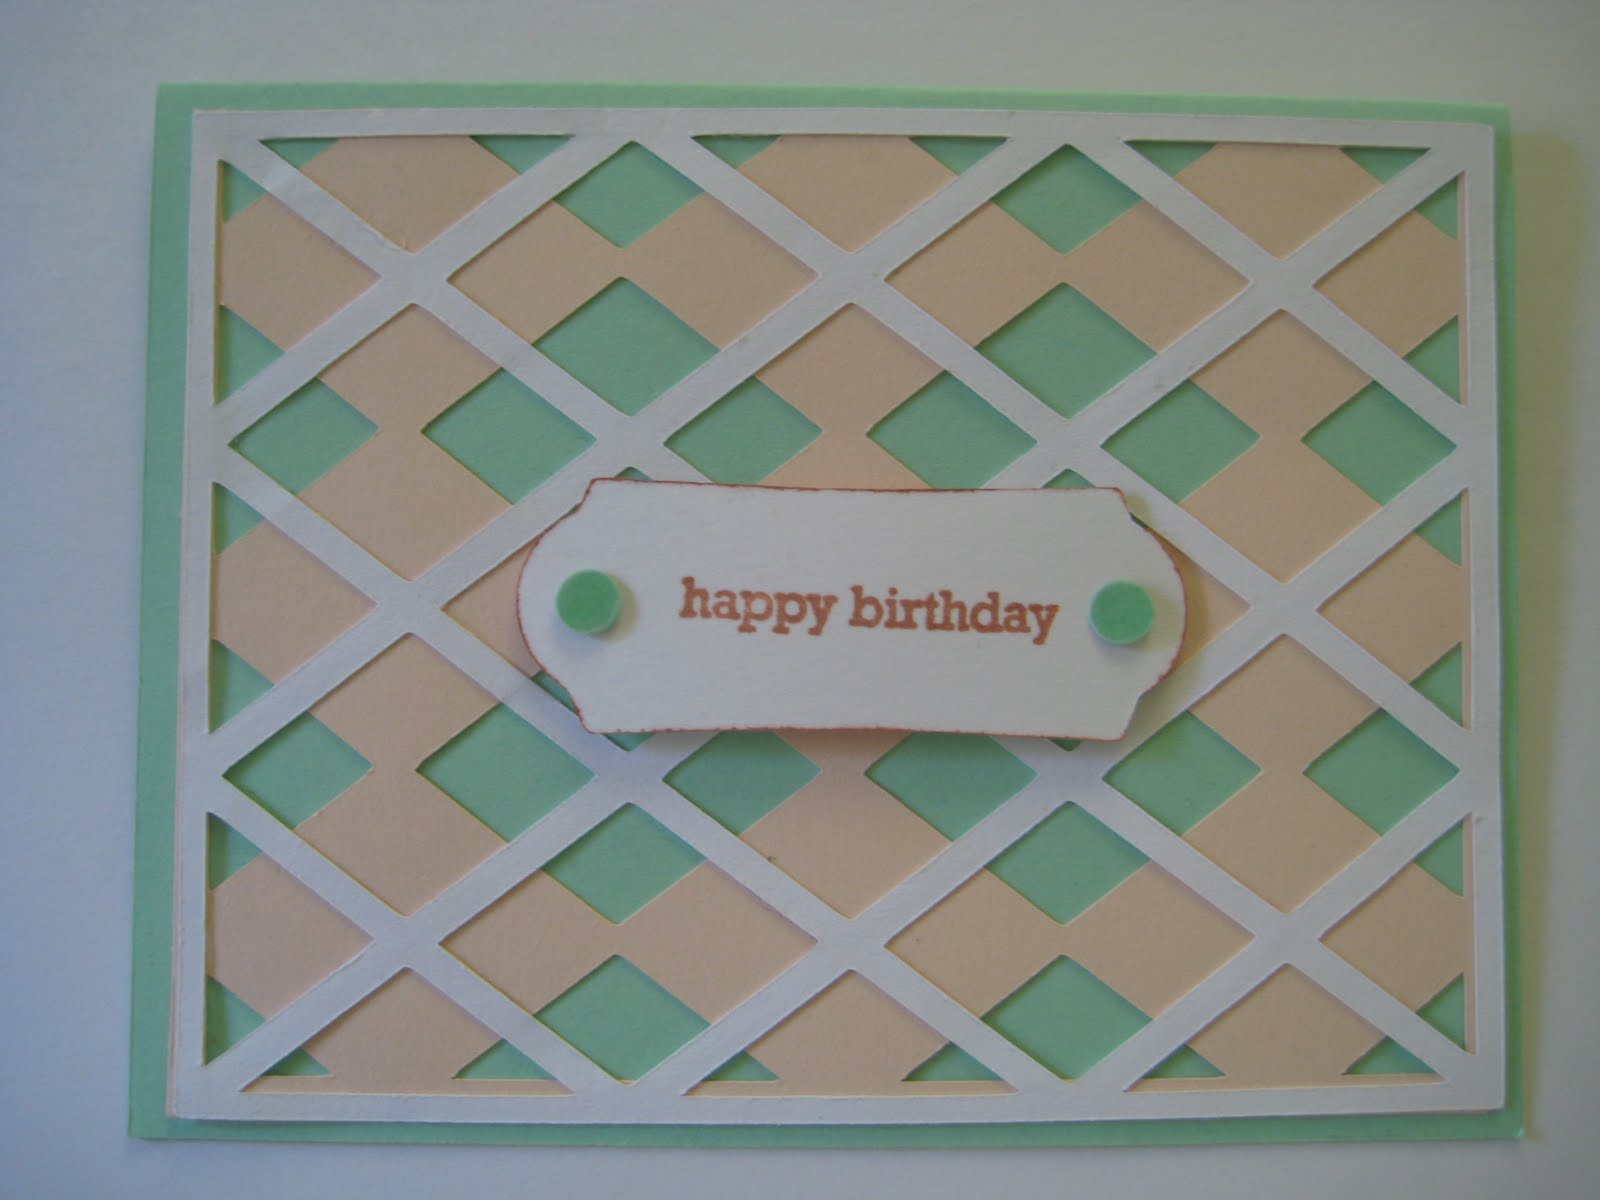
This one is from the green paper that was cut 5 1/2 by 4 1/4 and had a birthday sentiment already printed on it with my computer.  I also had the white portion of the argyle cut but it isn't in the picture.  I cut the bottom layer of the argyle (from Wild Card) in a corally pink.  For the sentiment, I cut out a frame from Twinkle Toes and mounted it with foam after inking the edges with the same ink I used for the stamped sentiment.  Yes, I did break down and buy one stamp set from Papertrey Ink.  I said I wasn't going to get into stamping but I have seen some cards where they've "bent" the stamp to curve the sentiment around a picture and that's what I wanted to do.  The ink was a little square of something I picked up at a dollar store.  Then I had to use an idea from one of the blogs I follow, sorry can't remember which one.  They used Versamark and clear embossing powder, several layers, to make buttons.  I didn't need anything as big as a button but I did a scrap and then punched it with a regular hole punch.  This may the shiny "brads" in a matching color at the end of the topnote.


This card is made using the Swiss Dot cuttlebugged piece of blue paper.  I think I had this as a trial when I first got the folder.  Again I used a frame from Twinkle Toes.  I hadn't really looked at the frames on this cart until I saw it on a blog.  I picked colors from my background for each layer, then took a sentiment I printed on the computer and cut it to fit.  The green/yellow layer is glued together and foam mounted, as is each of the other layers.  Bright and cheerful, don't you think?

I'm on my way up north to the lake for a week.  There's limited internet access and there won't be any card making so no posting for a while.  Hopefully I'll be able to get on enough to read my blogs. 

Thursday, July 14, 2011

Two more finished

I have two more of my "bits and pieces " of cards finished.  This first one is using the bird from Lyrical Letters.  Using Design Studio, I flipped one bird and then welded them together.  I planned them for an anniversary card when I first cut them out and so I continued on that path.

Using my computer program, I made a frame that says "Happy Anniversary" around it as many times as would fit.  I thought it showed up better when I took the photo. The striped background is from a Cloud 9 seasonal stack.  I used black pearls for the eyes and added some gold ones to the corners. 

The next card took some time to figure out and it still isn't quite right.  I had some images from my PCCrafter Hugware that I had printed on vellum.  I wanted to insert them into the middle of a card so the light would shine through. 

I cut the card with the window in white cardstock using George.  I sized the window to fit the picture and laid it on my DS screen so it would be in the correct place on an 5 1/2 by 8 1/2 piece of paper.  I then used that same cut on a 4 1/4 by 5 1/2 piece in pink for the front.  Now that I think about it, I could have layered the vellum between the two but nooo......I put it on the back and then cut a frame to cover the edge.  Duh, sometimes I guess you have to see it in print to get the idea.  I used the Large Flowers cuttlebug folder on the pink layer.  I'm putting another layer inside so the sentiment won't show through the vellum.

I have two more finished cards that I'll post tomorrow.  Then after a vacation, I can begin my next personal challenge.

Wednesday, July 13, 2011

Number 2 finished

In that pile of unfinished card parts was a yellow card with a sentiment  printed inside.  I had originally punched a few flowers and put them on but they looked so puny and childish that I didn't like it.  I pulled off the flowers, covered it with several papers and this is how it turned out.
 I started with the candle paper which had the yellow color of the card base in it.  The top piece has glittered swirls on it which don't show up well in the photo.  To finish if off, I added some glitter around the edge with DecoArt Twinkles Writer in crystal.   I also put it on the candle flames to make them shine.  Where the two papers come together, I cut a strip of blue, punched it and ran a strip of yellow behind the holes.  I then added a strip of light purple in the middle.  This helped bring all the colors together.

I still have a few more of my "unfinished projects" to post and then I can begin some new things.

Tuesday, July 12, 2011

This one is finished

In yesterday's picture of my unfinished projects, there was a blue bird cut from Stretch Your Imagination and a polka dot card from DCWV.  The sentiment had already been printed in the card and so had a tag saying "A little bird told me...".  I cut out a layer in brown for the bird to match one of the card colors and backed the sentiment with a scrap the color of his beak.  I used my gel pen to make lines in the shadow and added black pearls for the eyes.  Everything was pop dotted and here is the result.
Oh, and I cuttlebugged him to add texture and hopefully make it look like feathers.  It's not the best card I've ever made but  I can see that my skills are improving from when I started this almost a year ago. 

Tomorrow another card from the unfinished pile. 

Sunday, July 10, 2011

Challenging Myself

Yesterday I cleaned out a drawer in my craft room for all my Cricut cartridges.   In that drawer were a number of unfinished cards that I started BC (before Cricut) and a few cuts from my first carts.  I decided that I would challenge myself to finish these projects before starting new ones. 
Here is a picture of some of the things in the drawer.
For some reason I can't get the picture to print right side up.  I've had this trouble before when importing pictures to my blog.  They are correct in the folder but show up here sideways.

The card in the background with Birthday Wishes printed on it was just that.  I printed a mixed color sentiment at the top, planning to decorate the bottom portion.  I don't know what I had planned at the time but here's what I came up with yesterday.

The polka dot paper is from a Cloud 9 specialty pack. 
I used a border punch on one edge of a black strip
and then ran a scrap of burgundy down the middle.  This was an easy one.

That's 1 down.  I wonder what I can come up with for tomorrow.  Hmmm.


Thursday, July 7, 2011

3 in aTube

Here is my layout for the FCCB Challenge #67  "Pool Time".  While the pictures are actual from a lake rather than I pool, I think the layout still qualifies.  These are my triplet grandchildren being pulled in a triple tube behind a jet ski.

As you can see, I do all my layouts in 8 1/2" by 11" format.  I put them in sleeves and then in regular 3 ring binders.  I usually have more pictures and some journalling on my pages but for this challenge I wanted to keep it simple.
The cuts for the wave, swimsuits and seagulls are from Life is a Beach.  The paper for the wave, picture mat and "in the tube" are from DCWV's Amber Autumn stack.  The background for the suits is torn Coredinations tranquil blue.  The 3 is from Plantin in the same tranquil blue paper, cuttled with Divine Swirls and sanded.  It may be difficult to see in the photo.  It is also shadowed in white. The seagulls are cut from a shimmer paper and inked with Distress Ink in Broken China.  I just happened to have some cord in the exact same colors and wrapped it around a couple of times to represent the ski rope.

Wednesday, July 6, 2011

Another beginning card

I've been working on a layout today but haven't found a good way to take a picture of it.  Rather than skip a post today, I decided to show a card I made a while ago.  When I began making cards I had several boxes of DCWV colored and printed cards.  It made it easy to make simple cards.  Then when I got my Cricut, I made some trial cuts with the cartridges just to see how the machine worked and how the cuts layered.  This card is the result.
The cake is cut from A Child's Year in white with a black top layer.  The basic card is bright pink and so I thought the pink and black polka dot paper was a good compliment.  I added a sentiment printed on the computer and a strip of black paper at the edge of the printed piece.

Friday, July 1, 2011

One of my first Cricut cards

One thing I like about making my own cards is that you can customize them for the occassion.  When a friend was having open heart surgery, I wanted a card that spoke to that.  This is what I came up with.

The first layer of this A2 card is cut at 5 1/4 x 4 from red paper as is the heart from Fabulous Finds. It is on page 14, windows layer, and I hid the contours of the slit on top. The next layer is cut at 5 x 3 3/4 in a cream color.  (I would have cuttlebugged it if I'd had embossing folders at the time).  The band aid is also from Fabulous Findss, page 3, with the little holes hidden.  I cut it in a flesh color and used foam mounts in the middle to give it some dimension. 

I have a wedding tomorrow and then it's off to the lake for several days.  Unfortunately there's no internet so I won't be posting again until next Tuesday.  I hope everyone has a safe and happy 4th of July.