Showing posts with label c - MS Seasonal. Show all posts

Wednesday, November 20, 2013

CC, CFC 120 and OCC

 Curtain Call, and  CASual Fridays Challenge have teamed up for a challenge this week.

I got the idea for my card from Day 1 of the Online Card Class.


It's a Z fold card.   The tree is cut with my Cricut.  The snowflakes are from the Winter Wonderland stamp set from My Craft Spot.  I didn't even know I had them until I was looking for a sentiment for the card I posted the other day with icicles.  The blue ones are stamped with VersaMark and Tumbled Glass Distress Ink and then embossed with sparkle embossing powder.  Three shades of green Distress Ink were rubbed on the trees with Walnut added for the trunk.  The star on top is from a SSS die and embossed with sparkle.  To pull in the blue from the fireplace in the photo, I added a strip of blue along the side.  I wasn't sure about this at first but the longer it sat on my desk, the more I liked it.  I may even be my Christmas card for this year.

Thanks for stopping by.  Enjoy  your day.

Monday, November 18, 2013

FM #112

Good Monday to you all.  I hope you faired well with the storms that blew through the country last night.  More storms are likely so stay safe everyone.

I have a busy week so I'm glad I got some time to craft this weekend.  Today's card is for Freshly Made.

It took me a while to come up with something for this sketch.  I mean, you could do just about anything with it and a lot of people did.  Just check out their gallery.  This is what I decided on.  I'm sorry it didn't photograph well.


The background is inked with Tumbled Glass Distress Ink.  I'm not sure I'm using the right kind of paper because the ink seemed to drag even though I was using a light touch.  It does look rather cold, though, doesn't it?  The icicles are cut from the MS Seasonal cartridge from photo paper to give them some shine. They are embossed in white across the top to resemble snow.  I did a little nail-biting surgery on one of my stamps from My Craft Spot for the sentiment which is stamped in Tumbled Glass.  I have cut a few stamps apart before but this one was exceptionally close together.  It said " let it snow, let it snow" in small letters across the top of the one you (barely) see here . Fortunately it came out fine.

Thanks for stopping by.  I'm off now to view my videos from my online card class.


Tuesday, July 23, 2013

Trying New Things

Today is my first day to post something at Moxie Fab World.  They are having a birthday challenge, or several, but one features this sketch by Betsy Veldman.


There was an additional twist to this challenge.  You had to do ALL stamping or NO stamping.  Since I'm not really a stamper I had to do the "no stamp" challenge.  The difficult part of that was going to be the sentiment. It's huge in the sketch and although I could computer generate it, that didn't appeal to me.  I decided to try something else new.


Using my Cricut, I welded the letters from the MS Seasonal cartridge to a rectangle and cut it out.  The little gifts are hand cut from some paper by Imaginisce and I added the stripe paper from the same stack.  The Happy layer is popped up on foam tape. Obviously the word "birthday" will have to go inside.  It seems rather weird but I couldn't figure out how to put it on the outside and still look good.  Hmm while looking at this I got an inspiration.  I think I'll be tweeking this for another card.  Watch this space.

My next card is homework for the online card class.

I must say I worked quite a bit on this one.  It starts with a stamped background.  I have a few border stamps and decided they were the only ones I could use for this technique.  We also had a color combination we were to use - 2 shades of brown, 2 shades of purple, and blue- you needed to use at least 4 of these with any neutral.  AND you had to use one of three sketches. Whew!  That's a lot to pull together in one card, at least for me.  I thought I'd show you my "play around" sheet first.  Here are the experiments with colors and how I could get the stamps from CASual Friday to work together.  


And now for the final card.  Jennifer McGuire made one similar to this for class.


The background is stamped in Distress Inks with  Shaded Lilac going up and down and Tumbled Glass going across.  The banner is kraft cardstock stamped in Mememto Rich Cocoa.  I thought I needed a brown tie in in the background so I used a double dot stamp from the Best Mother Ever set from Simon Says Stamp. You really have to look for those little "extras" in your stamp sets. You never know when they will come in handy.  I used Frayed Burlap for them.  (Actually I used Antique Linen first but when I got the card all done, it looked too yellow so I restamped them.)  I added three dark brown hearts to follow the sketch and add more of that color and it's done.  Not bad for lack of stamps and ink to use.  It's not something I would ordinarily do but then that's why I'm taking the class.  To learn something new and stretch myself.

Thanks for stopping by to see what I've been up to.  I hope you have been able to stretch yourself and have fun with your crafting.

Monday, April 29, 2013

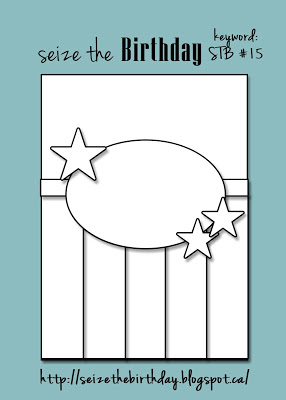
STB #15

There are some big changes going on over at Seize the Birthday.  A new blog design, new design team members and a new time frame for the challenge.  If you haven't tried this wonderful sketch challenge, head on over and check it out.  The sketch for this week is for a masculine card.


As I was thinking about this sketch and looking through some of my new paper pads, I came across one that inspired me.


The red paper reminded me of a bandanna and a western theme was born.  The rope is actually a Q cut from MS Seasonal out of kraft cardstock.  I drew the lines with a Zig pen and inked it with Walnut Distress Ink.  The sentiment was computer generated after I measures exactly where the rope would go.  The strip is some patent leather alligator(?) that looked like an expensive pair of cowboy boots to me.  The badge is from Create a Critter cut from silver paper and popped up on foam tape.  This turned out so cute IMO.

I hope you have a wonderful day.  Thanks for stopping by to visit.

Thursday, April 18, 2013

Retro Sketch #59

I keep saying I'm going to think outside the box and I think I've done it on the next few cards I'll be posting.  Today's card is for Retro Sketches

.
Normally I would cut the double layer banner and put flowers on top.  Instead I came up with this.


This will make a great Father's Day card so I'm ahead of the game. The card base is embossed with the houndstooth folder.  The tie is from Simply Charmed, cut from Little Sports paper by FancyPants. The word "dad" is from MS Seasonal and the tie and letters are popped up on foam tape.

I do need to say that my Dad never wore ties quite this sedate. Mom used to make him some out the most colorful material.  In fact I was looking at a few of them yesterday when I was organizing their closet and Mom said to throw them out.  I should have taken a picture to post.  You would have gotten a chuckle out of them. Some I swear were more than 4 inches wide.

Thanks for stopping by to visit and enjoy your day.

Wednesday, January 16, 2013

Shame on Me

You will NOT believe what I had to do!  I had to buy a birthday card.  That's right, I said buy.  I'm in Alabama for 2 months and only brought with me the cards I needed for known birthdays and Valentines' Day.  Last night there was a party for a friend we know down here and I didn't have an extra card to give her.

I will not be doing many challenges while I am here, either, since I have no paper crafting material with me.  (sob sob).  I am lucky enough to be able to enter one of my valentines in the My Craft Spot - anything goes but use a MCS stamp.  I love Kimberly's stamps and dies and use them frequently.


The heart is cut from Martha Stewart's Seasonal Cake cartridge.  The border is an MS punch.  The little tag is cut from the My Craft Spot tiny tags die, a pink background and white top layer.  The sentiment is also from one of the tiny tags stamps.
 
It's rainy today so I guess I'll have to work on another craft project - sewing the binding on my baby quilt. 
 
Have a great day and happy crafting!

Tuesday, December 18, 2012

PP and PDE

It's such a busy time of year but I still wanted to get a couple of cards posted.  I haven't been on in a week and it feels like I'm getting out of the groove.

This week both Paper Players and Pause Dream Enjoy have snow/snowflakes as their challenge.
I used the sketch from Mojo Monday.


The blue background is from Core-dinations and embossed with the Snowflake folder.  I then sanded the embossing to lighten the flakes.  The base card and piece behind the snowflakes is cream, with the edges inked with Weathered Wood Distress Ink.  The snowflakes are cut from sparkle paper with 'Tis the Season and the icicles are sparkle paper from MS Seasonal.  This sparkle paper is why I went with cream instead of white.  It matches.  :) 

Now I'm off to the airport to pick up my sister who is flyiing in from Denver.  This may be the first year that weather hasn't caused delays in her trip. 

Monday, November 26, 2012

Winter Blues

Happy Monday everyone.  We woke up to about 2 inches of snow yesterday.  It was beautiful but the older I get the less I like it. 

I want to say a big Thank You to the girls at Fantabulous Cricut for choosing my pilgrim card as one of their top five.

Today's card is for Freshly Made

 and CASual Fridays - winter blues.


The paper is from The Paper Studio's Ornamental Christmas except for the glitter blue and white. They came from DCWV Linen Closet.  The snowflake is cut from MS Seasonal cartridge and the white embossed stamp is from My Craft Spot.  Kimberley is having a sale on her stamps until the end of the month so if you are in the market, check out the link.

Monday, October 29, 2012

Shimmering Snowflakes

As "Frankenstorm" invades the northeast,  I pray that family and friends who live in that area are safe, and that it won't be as bad as predicted.

Snow will be coming sooner, rather than later, but I prefer to see it on cards instead of on the ground.  When Die Cutting Diva's asked for Shimmer, Glimmer, Gloss on cards for their challenge this week, the first thing I thought was "I'm not much of a glimmer girl."   Then I thought "Snowflakes are rather shimmery, especially when the sun shines on them."


The snowflakes are cut from MS Seasonal Cakes cartridge in several sizes from white cardstock.  They were then embossed with Sparkle embossing powder and edged with Evergreen Bough Distress Ink.  The card base is white, layered with a glitter cardstock from DCWV's Linen Closet, and a paper from The Paper Studio's Oranmental Christmas.

You can see the shimmer better in this photo.


Here is a closeup of the smallest snowflake, popped up on dimensionals.


I'm hoping these are the only snowflakes I see for quite a while.


Wednesday, October 3, 2012

Fall Blessings

The colors in nature are beautiful this time of year.  I love fall when all the trees begin to dress themselves in reds, oranges, and yellows.  The only drawback is like my dad said the other day when I pointed out a particularly colorful copse of trees.  "That means the next thing we'll see is S N O W."

The challenge at Thankful Thursday is make a card with a leaf and some bling.  I had to make a fall colored one.


I had a reverse cut from another project on my desk and decided that was the technique I wanted to use.  Using Design Studio, I made a 4.25 by 5.5 rectangle with George.  At the bottom, I put the rounded rectangle for the sentiment to show through.  In the middle, I added the leaf cut from the Martha Steward Seasonal cartridge.   I cut one from designer paper from an old DCWV stack - "Amber Autumn" and another one from white cardstock .  I needed the extra layer to give it some stabililty when I mounted it on foam tape.

I printed the sentiment from the computer on the bottom layer of paper and cut the leaf layer in another paper to  mount inside the cutout on foam.  Everything was inked with Dried Marigold Distress Ink.  I just happened to have a few gold rhinestones so I used them on the corners for my bling.  This might not be quite as colorful as some of the trees I see from my window, but I'm liking this card and the technique. 

Friday, June 22, 2012

Stamps?


When I saw this sketch from Mojo Monday, I immediately thought of postage stamps for some reason.  Maybe because I just got a postage punch?  ( I didn't even use it for this.)   And what goes better with stamps than postcards. 


The background paper, with light writing on it, is from MMI Lost and Found.  I used the middle of the paper to cut the postage stamp background with MS Seasonal Cake cartridge.  It's actually a font but I hid the contours of the letters with DS.  I fussy cut some other paper from Lost and Found that looked like images you would find on stamps.  They are barely visible but I rather liked that look.  There's a crown, bird and bike.  The postcard section is cut from a photo stack and everything is aged with Antique Linen Distress Ink.  I wrapped the twine from My Craft Spot to look like a stack of cards (?).  This could be used for a regular note card or almost any occasion with the right sentiment inside.