Showing posts with label c - Stretch Your Imagination. Show all posts

Saturday, November 23, 2013

Casology #71

I've been taking the Online Card Class and got some great ideas for holiday cards.  Debby Hughes did a dry embossing over embossing paste that looked like molten metal and I knew that was just what I needed for the CASology challenge this week.


I play in the hand bell choir at church and knew immediately that was how I was headed with this card.  It will be great to give the director for Christmas.


I cut the bell from the Stretch Your Imagination Cricut cartridge.  It had a clapper hanging out, so I taped off the clapper and handle before using the negative cut to put on the embossing paste.  I poured gold embossing powder over the image and heat set it.  I cut the handle from the positive image, embossed it with black powder and glued it on.  The NBUS sentiment is from PTI's Signature Christmas stamped in Peeled Paint Distress Ink to match the background music paper.  I was originally going to center the white panel but not enough of the music showed, so I stuck it up in the corner, mounted on foam tape.

Thanks for stopping by.  It's really cold here today so I'm planning to hibernate in my craft room.  How about you?

Tuesday, September 24, 2013

CTS #46 and Curtain Call


Hey all!

I love sunflowers, don't you?  You can't help but smile when you see their sunny faces.  This week, Curtain Call has Sunflower Surprise as their challenge.  This is a new challenge for me but after seeing other bloggie friends cards,  I just HAD to make a sunflower and enter.


I thought the sketch at CASE this Sketch would be a perfect layout for my card.


I knew there was a large sunflower on the Stretch Your Imagination Cricut cartridge so I started there.  Now what would work as a background?  It couldn't be too busy or too dark so the flower would really stand out.  I had this Core-dinations cardstock in my stash with a golden back.  I ran it through my Cuttlebug with the Distress Stripes embossing folder and then sanded it.  I think it rather looks like a fence.  The little tag and sentiment are from My Craft Spot, accented with a jute bow.  It says "happy" to me.  What do you think?

Thanks for stopping by and may the sunflowers be smiling at YOU.

Thursday, July 25, 2013

Camp Homework and CAS gold

On week 3, day 2 of Summer Card Camp 2, Jennifer McGuire talked about heat embossing die cuts.  Her technique made those cuts look wonderful and so I tried my hand at it.  Still using the color combo of 2 browns, 2 purples and blue, I created this card.  If Jennifer can use gold as her brown, I guess I can, too.


I don't have many dies so my image was cut with my Cricut from Stretch Your Imagination.  I cut three images, gluing two together to give it more stability.  I then heat embossed it several times with Ranger super fine gold embossing powder.  I cut the flowers from the third image, swiped them with Dusty Concord Distress ink and Hero Arts Soft Lilac, and embossed them with sparkle powder.  To show off this flower, I used my Nestibilities oval dies to cut white and blue cardstock in two sizes.  This layer is popped up on the card that is stamped with a PTI Healing Touch sentiment and gold embossed.  I love this technique and will be doing it again.....and again.

I'm also going to enter this in the challenge at CASology.


The homework for today is a challenge to do a style of card that is new and/or different for you.  Now that has me stumped.  I started making "cute" cards with my Cricut.  Then I went with more sophisticated images.  From there I did some rustic cards, graduating to the clean and simple style.  Tell me.  What's left besides Shabby Chic?.  I absolutely refuse to put 3D flowers on a card.  You can't mail them and that's how I send my cards - so what's the point.  If you have a suggestion for a different style I can try, post it below and I'll give it a whirl.

Thanks for your visit today.  If you leave a comment to let me know you were here, I'll return the favor.


Wednesday, July 24, 2013

Retro Sketches #73 & Jackie's Challenge

I saw on Lynn's blog that there is a different sort of challenge with an excellent give away.  Jackie Rockwell is working her way through the Pantone colors in her blog header.   You can create a card in one, or  all of the colors, post it on her blog and win a chance for a new blog header of your own.


This week's color is tender shoots, gray and white.  Sounds interesting, doesn't it?  So I jumped right in and made a card.


I am sorely lacking in Sympathy cards and thought this simple green plant cut from Stretch Your Imagination would do the trick.  I placed it on a panel of white, with a little overhang, and then popped the panel up on a gray card.  I punched out some gray circles for the berries and covered them with Glossy Accents.  Then sentiment is from Hero Arts stamped in their Charcoal ink.  It looks rather dark in the photo but it really is more of a tender green, almost the color of the new grass growing in my lawn.

While I was cutting, I decided to make a second card using a printed background.


I also got a card made for this week's Retro Sketches.


This one is a decidedly masculine card which I know some people have trouble with.  I find them fun and easy.


This could have been one of those 10 minute cards.  I took a piece of kraft cardstock and ran it through my crimper.  I stamped cream cardstock in Memento Tuxedo Black ink with a sentiment from Hero Arts "It's Your Day" and cut them into flags.  The black stamp is a die from My Craft Spot, cut from Core-dinations kraft core cardstock, and sanded.

Thanks for stopping by today.  I hope your day is all you'd like it to be.

(My preview screen shows different fonts on my blog.  I hope it comes out right when I actually post it.  If not, blame Blogger, not me. *_*)

Friday, May 24, 2013

MUSE #18

The Muse for MUSE this week is Marion Vagg and her brightly colored flowers.


They reminded of the Pennsylvania Dutch patterns that we used to paint on things eons ago.  I don't have any stamps to recreate this so I had to come up with something using Cricut cuts.


I put my bright color in the striped border and then did big pink (they are really bright pink) flowers in blue polka dot pots.  A little stamp from My Craft Spot,  in Faded Jeans Distress Ink, and I'm done.  Oh, wait,  I did pop up the flowers, cut from Stretch Your Imagination, on foam tape.

Thanks for stopping by to visit.  I appreciate your comments, so please leave one.


Friday, March 29, 2013

PP 138 and FCCB 154

No long explanation today.  I have to post and then head to Panera for breakfast with my daughter.  We have a day of shopping, visiting my granddaughter and who knows what else planned.  Should be a fun day!

I wanted to do something different with the Paper Players sketch and so I combined it with the Easter Greeting at Fantabulous Cricut.


The bunny is cut from Stretch Your Imagination.  I used a Peachy Keen stamp for his face and I can't decide if he looks happy or mischievous.  I wrote the sentiment with my gel pen.  Cute, but not my best work by far.

Have a great day and thanks for stopping by.

Wednesday, May 16, 2012

A Toast

I just realized yesterday that I haven't labeled my cards since the new blogger made it's appearance.  Ugh.  Now I'll have to go back through them and do it but I think it will be rather easy.  Now if I just remember to do it from now on.  ^_*

Today's card is for the challenge at My Sheri Crafts - Wedding/Anniversary, black and white with a pop of color. 


I combined three cartridges for this card.  The glasses are cut in vellum from Stretch Your Imagination., the background from Elegant Edges and the sentiment tag (my pop of color in purple) from Fabulous Finds.  I used twine purchased from My Craft Spot to attach the sentiment.  I have someone special in mind for this card.

Tuesday, May 15, 2012

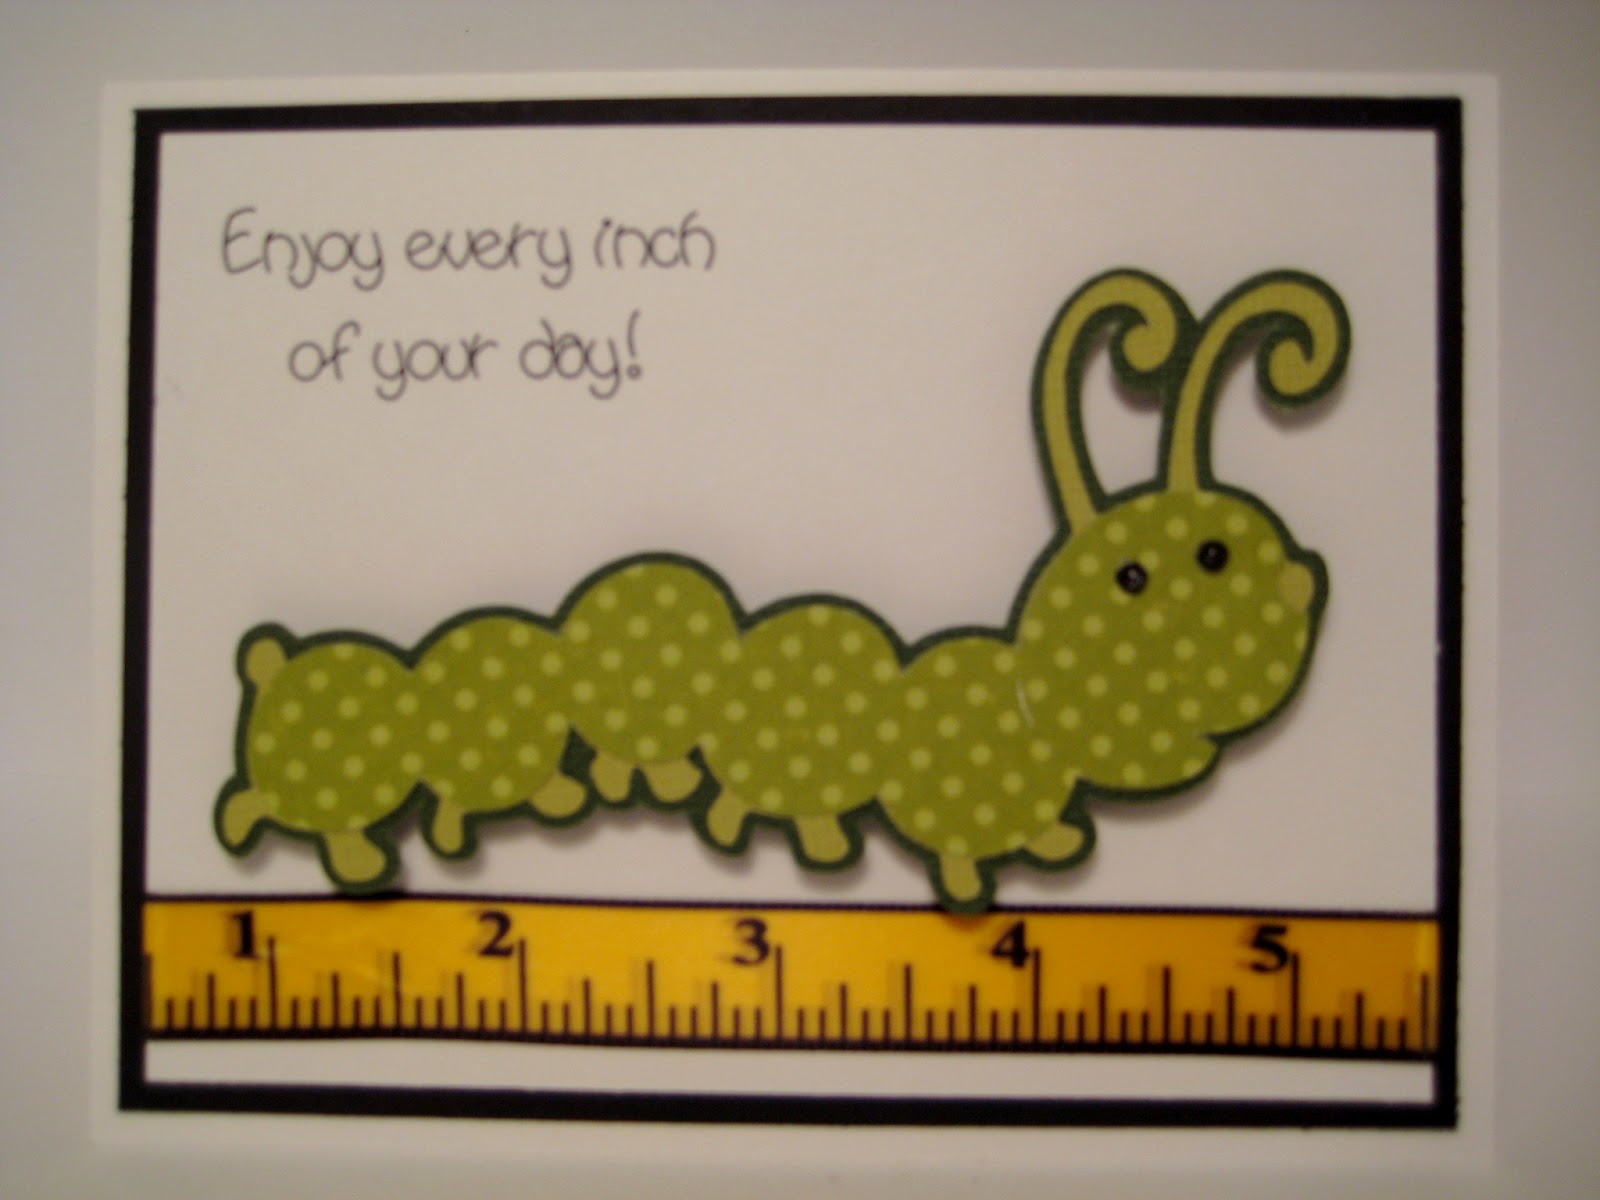
Inch by Inch

The challenge at Paper Playtime is die cut bug cards.  There are so many cute bugs of all kinds on the various Cricut cartridges.  I decided to use the caterpillar from Stretch Your Imagination.


I used only 3 layers of the caterpillar - shadow (dark green), feet and antenna (light green) and body (polka dot).  The card base is white with a layer of black and then another white which has the computer generated sentiment printed on it.  I wrapped the measuring tape ribbon around the top layer before adhering it to the black one.  The eyes are pearls that have been colored with Bic markers.  I hope you all enjoy every inch of your day, too.

Tuesday, April 24, 2012

Sunset Tree

I'm trying a new challenge blog today.  I can't remember whose blog I found them on but I hopped over to Paper Lovin' Gals and saw their photo inpiration.


I knew immediately what I wanted to do.  I made a card once using a cut from Stretch Your Imagination.  I liked it and wanted to use something similar.  The image direct from the cartridge has a wide border and small tree.  I knew if I wanted the sunset to show, I would have to stretch my imagination (lol) and put together other images, weld and cut them to make what I was looking for.  Here is the result.

The card base is cut from kraft cardstock with the dark tree overlay in bitter chocolate.  I watercolored the background on regular cardstock, glued it down behind the opening and added some brown stitching around the edge.  I'm not sure what occasion I will use this for, but it's good for almost anything.

Thursday, April 12, 2012

Lessons Learned

I saw a tutorial on She's a Sassy Lady last Saturday with a cut card.  (Click on the link to see the post).  She challenged people to  make this card and, liking a challenge (and the card) I accepted.  It proved to be more of a challenge than I thought and I learned a lot of lessons along the way.

Just so you don't get bored with my long post, I'll show you the finished card up front.  It is 5 1/2 by 5 1/2 and a little difficult to see in this picture because of the shadows but I couldn't help that.  It's the way the card is made.


When I learn something new, I like to follow directions initially.  I'm big on reading manuals, too.  (insert smirk).  I couldn't follow all the directions in the tutorial and hence the challenge.  First - it was a Gypsy tutorial and I don't have a Gypsy.  But I do have Design Studio and there's always Cricut Craft Room.  I started out in CCR but it drove me crazy and since I'm more familiar with DS, I ended up using it.

Second - I don't have Birthday Bash, which is what Sheila used.  Okay, there's plenty of other card cuts, right?  I needed something with a big window and couldn't find a full card cut like that.  I tried to make my own.  Lesson - you can't weld a square in a square with lettering on top and have it cut out part of the window and the lettering.  It showed the cut all around the square.   I ended up using a frame from  Stretch Your Imagination , page 33, and welding it to a square from George.

Third - I didn't have a "Get Well Soon" sentiment on any of my carts.  I didn't want to spend hours trying to make my own so I went with "With Sympathy" from Wild Card.  Lesson - don't make a cut out with an "I" in it.  There's no place to put the dot. : (    I hope this still qualifies for Sassy Lady's challenge. 

I used double sided paper so the inside would be pretty.  Lesson - be sure your paper is placed in the right way if there is a directional image on the reverse side.  Fortunately for me, the reverse was stripes and I like them going horizontally but if I didn't. . . .

Now that I've either taught you or bored you, here are pictures of the card from other angles.


I printed the sentiment on the computer on a cream color cardstock and cut it 5 1/4  by 10 3/4.  I taped down only the back edge.  I did this so the sentiment would not show through the cut on the front.   I wrapped a piece of ribboon around the middle and tied it in front.


You can see how it is loose.


I didn't have any glitter paper that matched so I heat embossed the sentiment with sparkle embossing powder. 

Now that I have learned all my lessons, I think I will try a similar card again.  I'm also entering this in My Craft Spot's Inside Out challenge #51 (a sentiment on the inside and outside)